Mid-level (I): Advanced APP Operation
I.Preface
Hey, the future Sparky training master! You have embarked on an exploration journey with your Sparky. Familiarizing yourself with its startup, interaction, and usage process, which undoubtedly adds a lot of fun to life. Now, let's take action editing to the next level and create more unique action sets for your Sparky.
II.Preparation Work
| Steps | Introduction |
|---|---|
| Software: download the APP and install it according to the prompts. |  |
| Environment: Sparky has been connected to the Internet and successfully connected to the mobile App. | This section will not repeat the basic configuration and other operations. Please refer to this document: Unboxing:Entry-level Configuration and Usage for relevant information. |
III.Keyframe Mode
Keyframe Mode (Edit Mode): Provides more accurate control ability, allowing to adjust the action details of each frame of Sparky, including parameters such as speed, acceleration, pause time and angle; While editing parameters, the values will be sent to the device for synchronous adjustment. This mode enables precise adjustment of each frame action, thereby achieving higher precision and high control system.
Users can be familiar with the use of Keyframe Mode according to the effect video. The following is a breakdown of the steps in the text version. If you have any questions, please refer to the details.
3.1 Enter Keyframe Mode
| Reference pictures | Steps |
|---|---|
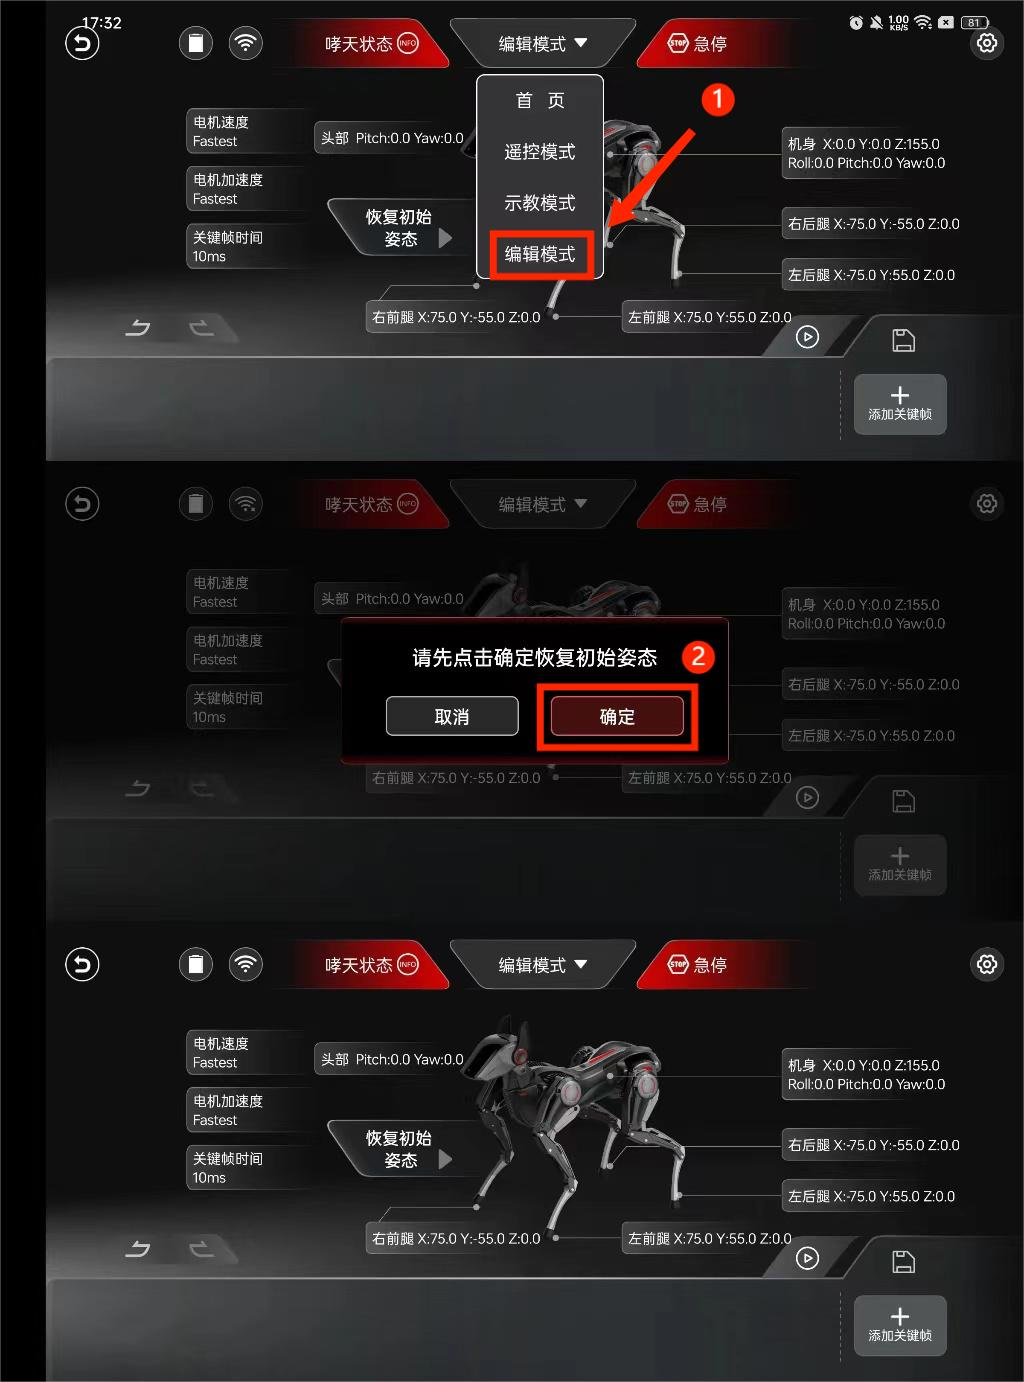 | Label 1: Switch to Edit Mode through the top bar.Label 2: After entering the page, it prompts to restore the initial posture. Press "OK" to confirm. The editing page displays the joint parameters of Sparky in its initial posture as a reference for users when editing actions. |
3.2 Create new keyframes
| Reference pictures | Steps |
|---|---|
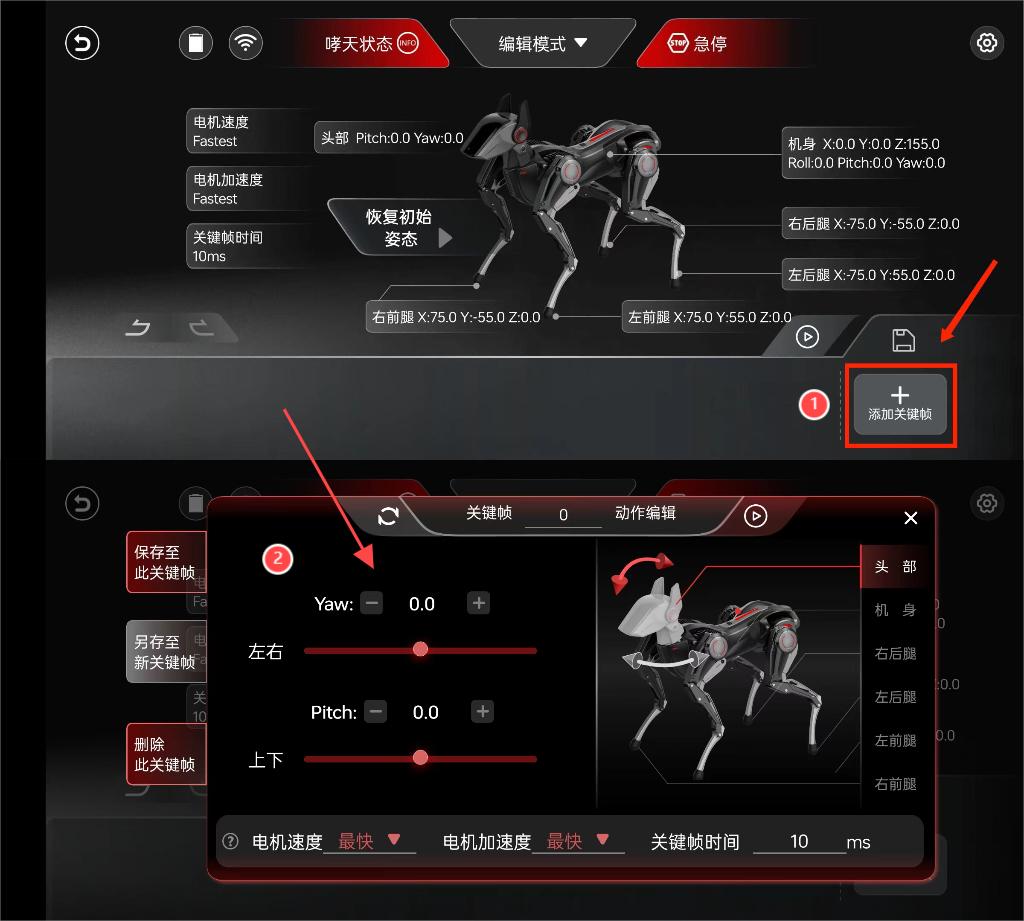 | Label 1: (New Keyframe) Click "Add Keyframe" to enter the editing page.Label 2: (Edit Page)Users can modify the XYZ three-axis parameters of the head, body, right hind leg, left hind leg, left front leg, and right front leg on the page, create keyframes for one frame of Sparky, and perform operations such as save, save as, and delete. |
3.3 Example keyframes (breakdown steps)
The following is an example of a keyframe for creating a Sparky's head up and butt twist. The specific parameter values are for reference only.
| Joint | Parameters |
|---|---|
| Head | Yaw: controls the left and right rotation of the neck. Pitch: controls the up and down movement of the head. |
| Body | Roll:Control the rolling motion of the body. Pitch:Control the pitch motion of the body. Yaw:Control the yaw motion of the body. |
| Legs | X-axis: Control the forward and backward movement of the legs. Y-axis: Control the left and right swing of the legs. Z-axis: controls leg movement up and down. |
After understanding the joint parts, parameters and their definitions that we can modify, let's create a new keyframe!
| Steps | Reference pictures (comparison before and after modification) |
|---|---|
| Step 1. Edit the head parameters: We need a keyframe for creating a Sparky's head up and butt twist. To achieve this, the Pitch parameters need to be modified to lift the head, and at the same time, in order to make Sparky look more agile, the Yaw parameters need to be modified to achieve left and right neck turning. | 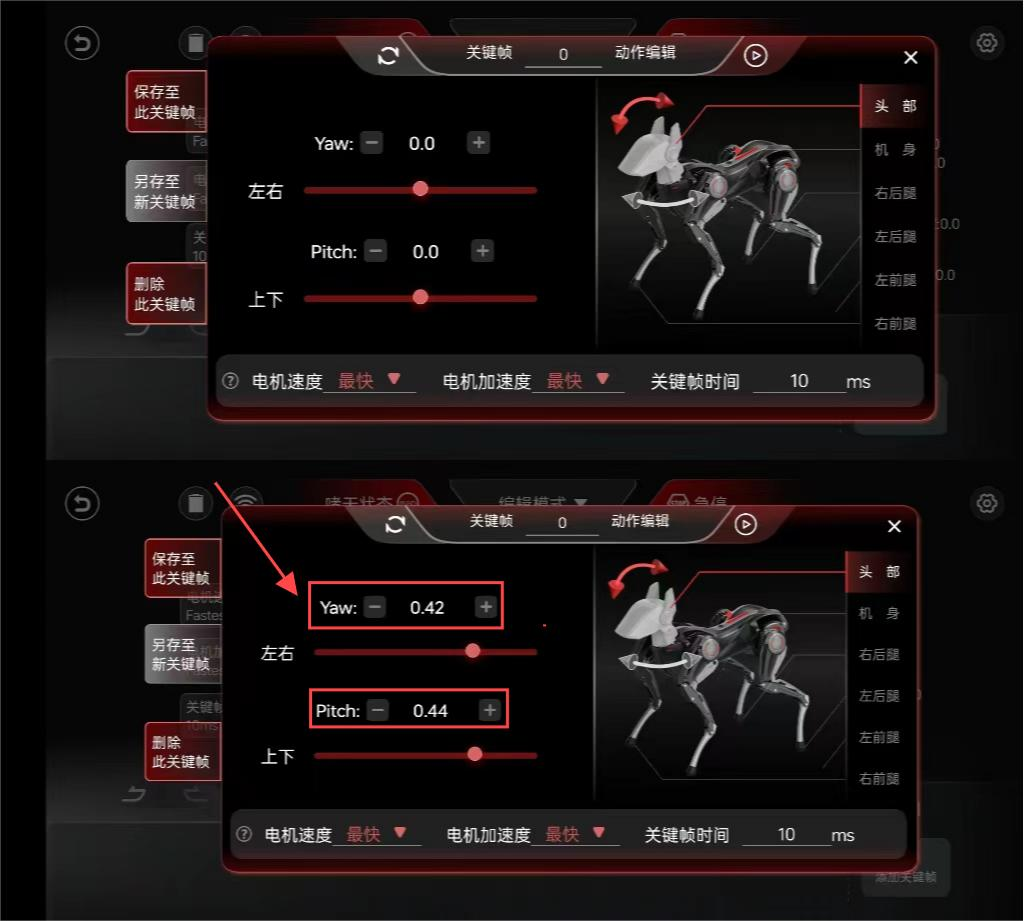 |
| Step 2: Edit the body parameters: In order to make the overall movement more coordinated, when Sparky's head is lifted, we also tried to modify the body pitch parameters to achieve the twisting of the buttocks with the tail of the body raised and the front lowered. We also added the Yaw parameter to the neck, and the body can be fine tuned with this parameter. | 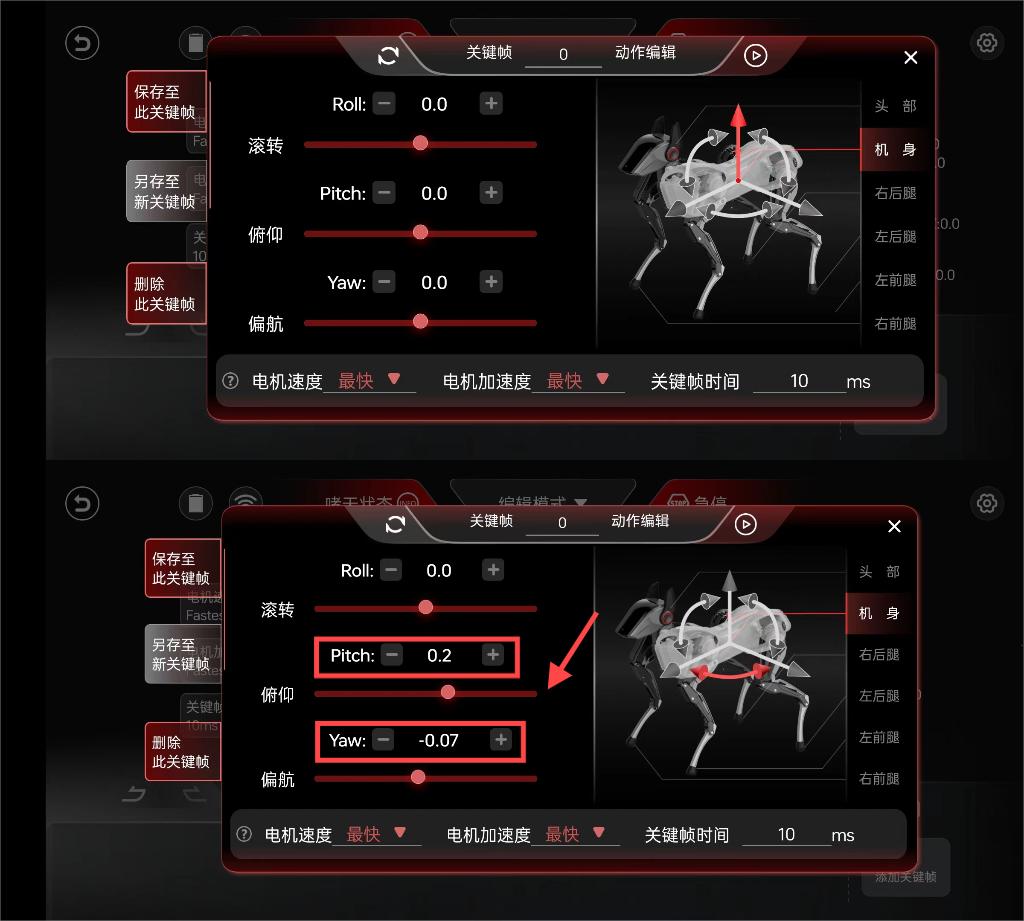 |
Step 3: Edit quadruped parameters: When adjusting, pay attention to the original parameters of each leg to ensure natural and coordinated movements. The legs can be modified to include left hind leg, right hind leg, left front leg, and right front leg. To match the posture of the body, the upper and lower parameters of the legs need to be adjusted, lowering the position of the front legs and raising the position of the hind legs to achieve a twisting posture for Sparky.
| Reference pictures (right hind leg) | Reference pictures (left hind leg) |
|---|---|
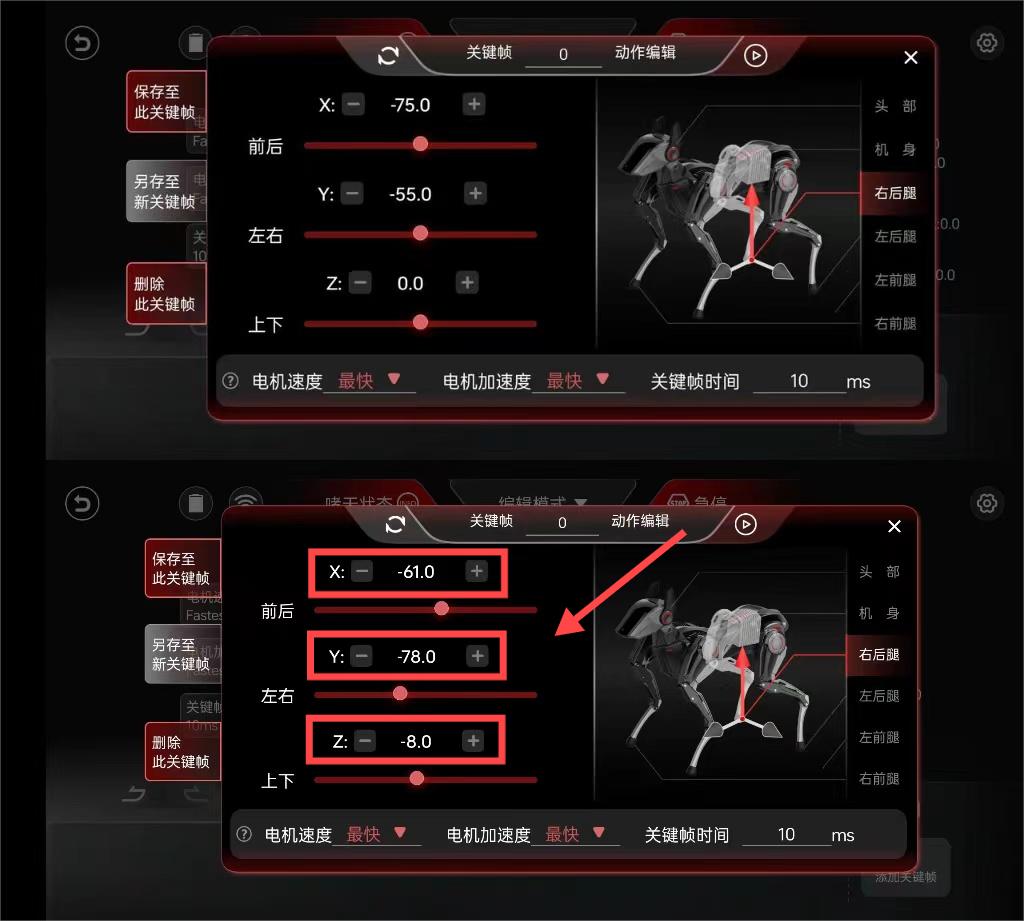 | 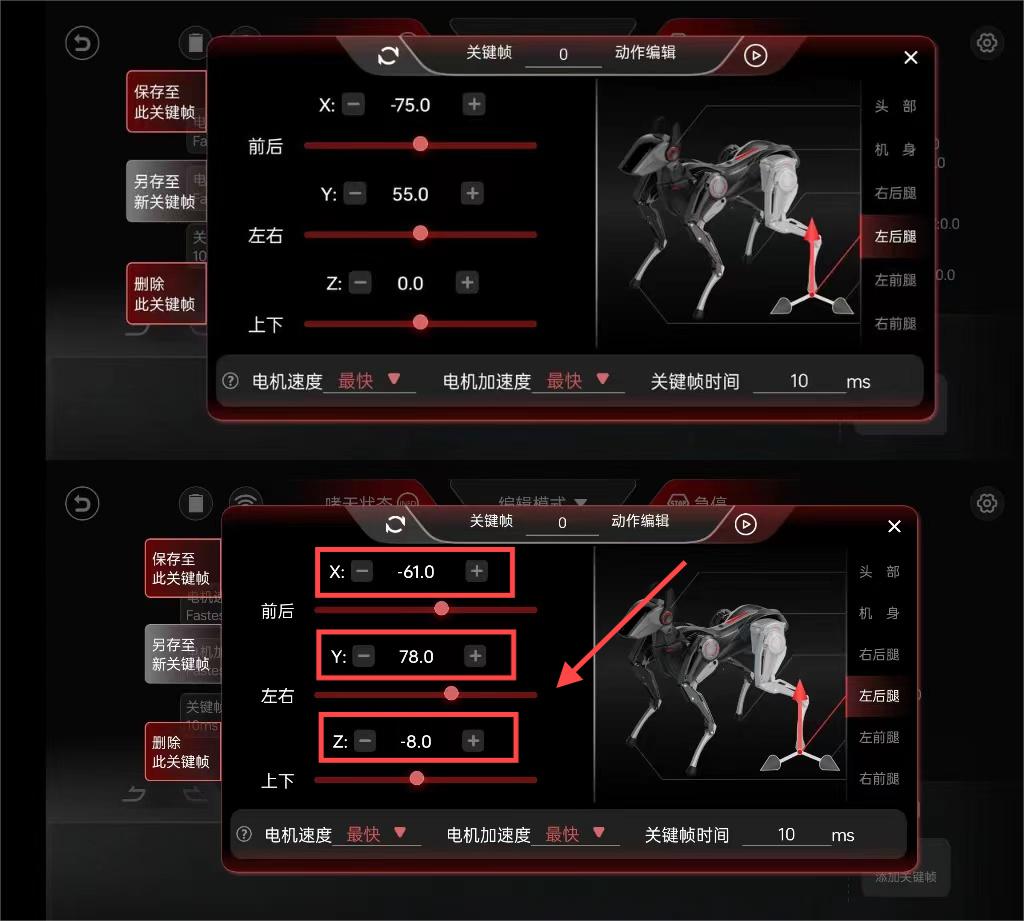 |
During the fine-tuning process, it is possible that raising the hind legs may cause Sparky to become unstable. At this point, the parameters of the hind legs can be fine tuned to make the support surface of the hind legs wider and stand more steadily.
| Reference pictures (left front leg) | Reference pictures (right front leg) |
|---|---|
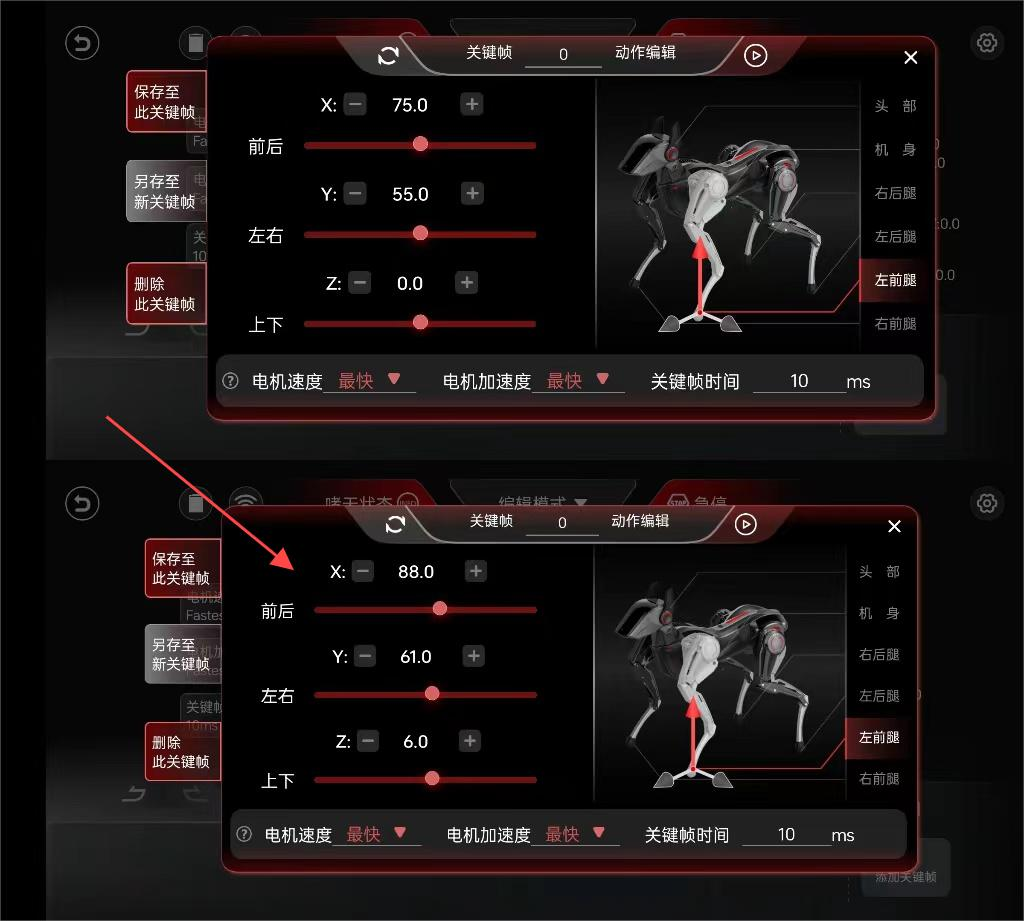 | 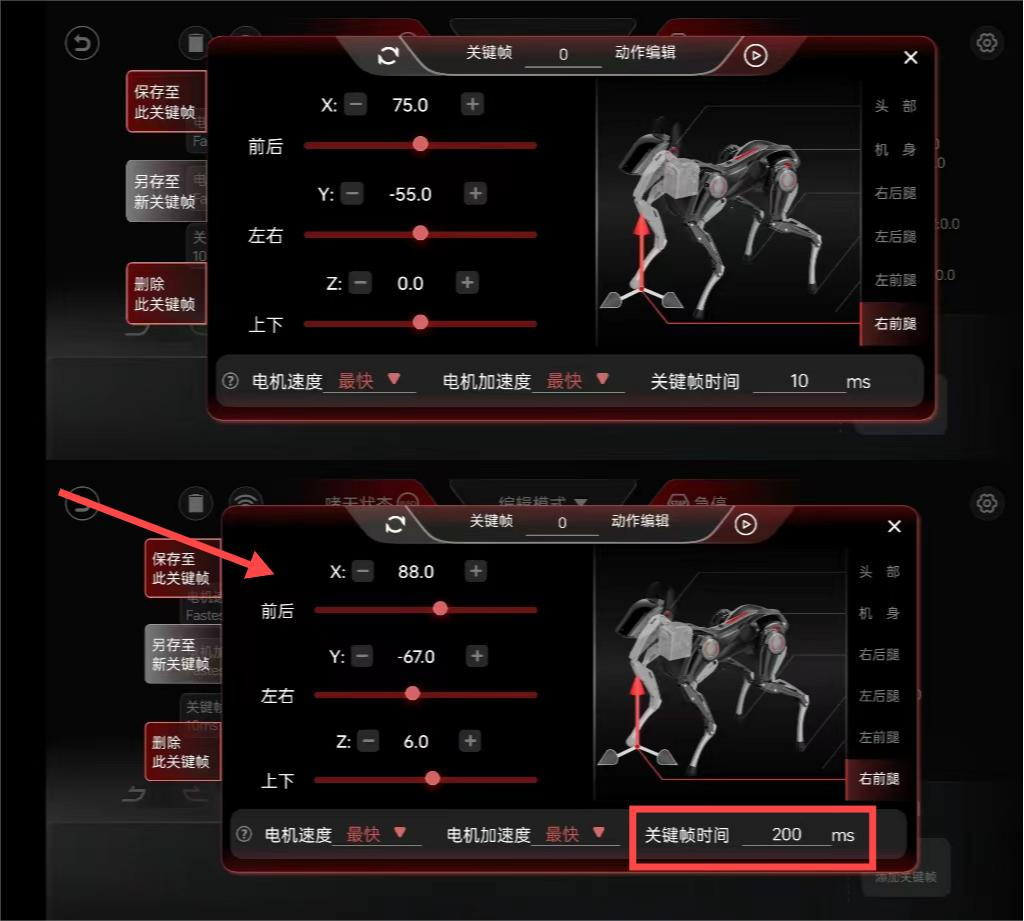 |
After completing all parameter adjustments, we can adjust the keyframes to 200ms to observe Sparky.
| Steps | Reference pictures |
|---|---|
| Step 4: Save keyframes: After editing, click the save button on the left (labelled as 1) to save the keyframes of this frame. |  |
| Step 5: Play keyframes: Clicking on the play icon (triangle) in the lower left corner will play this keyframe. | 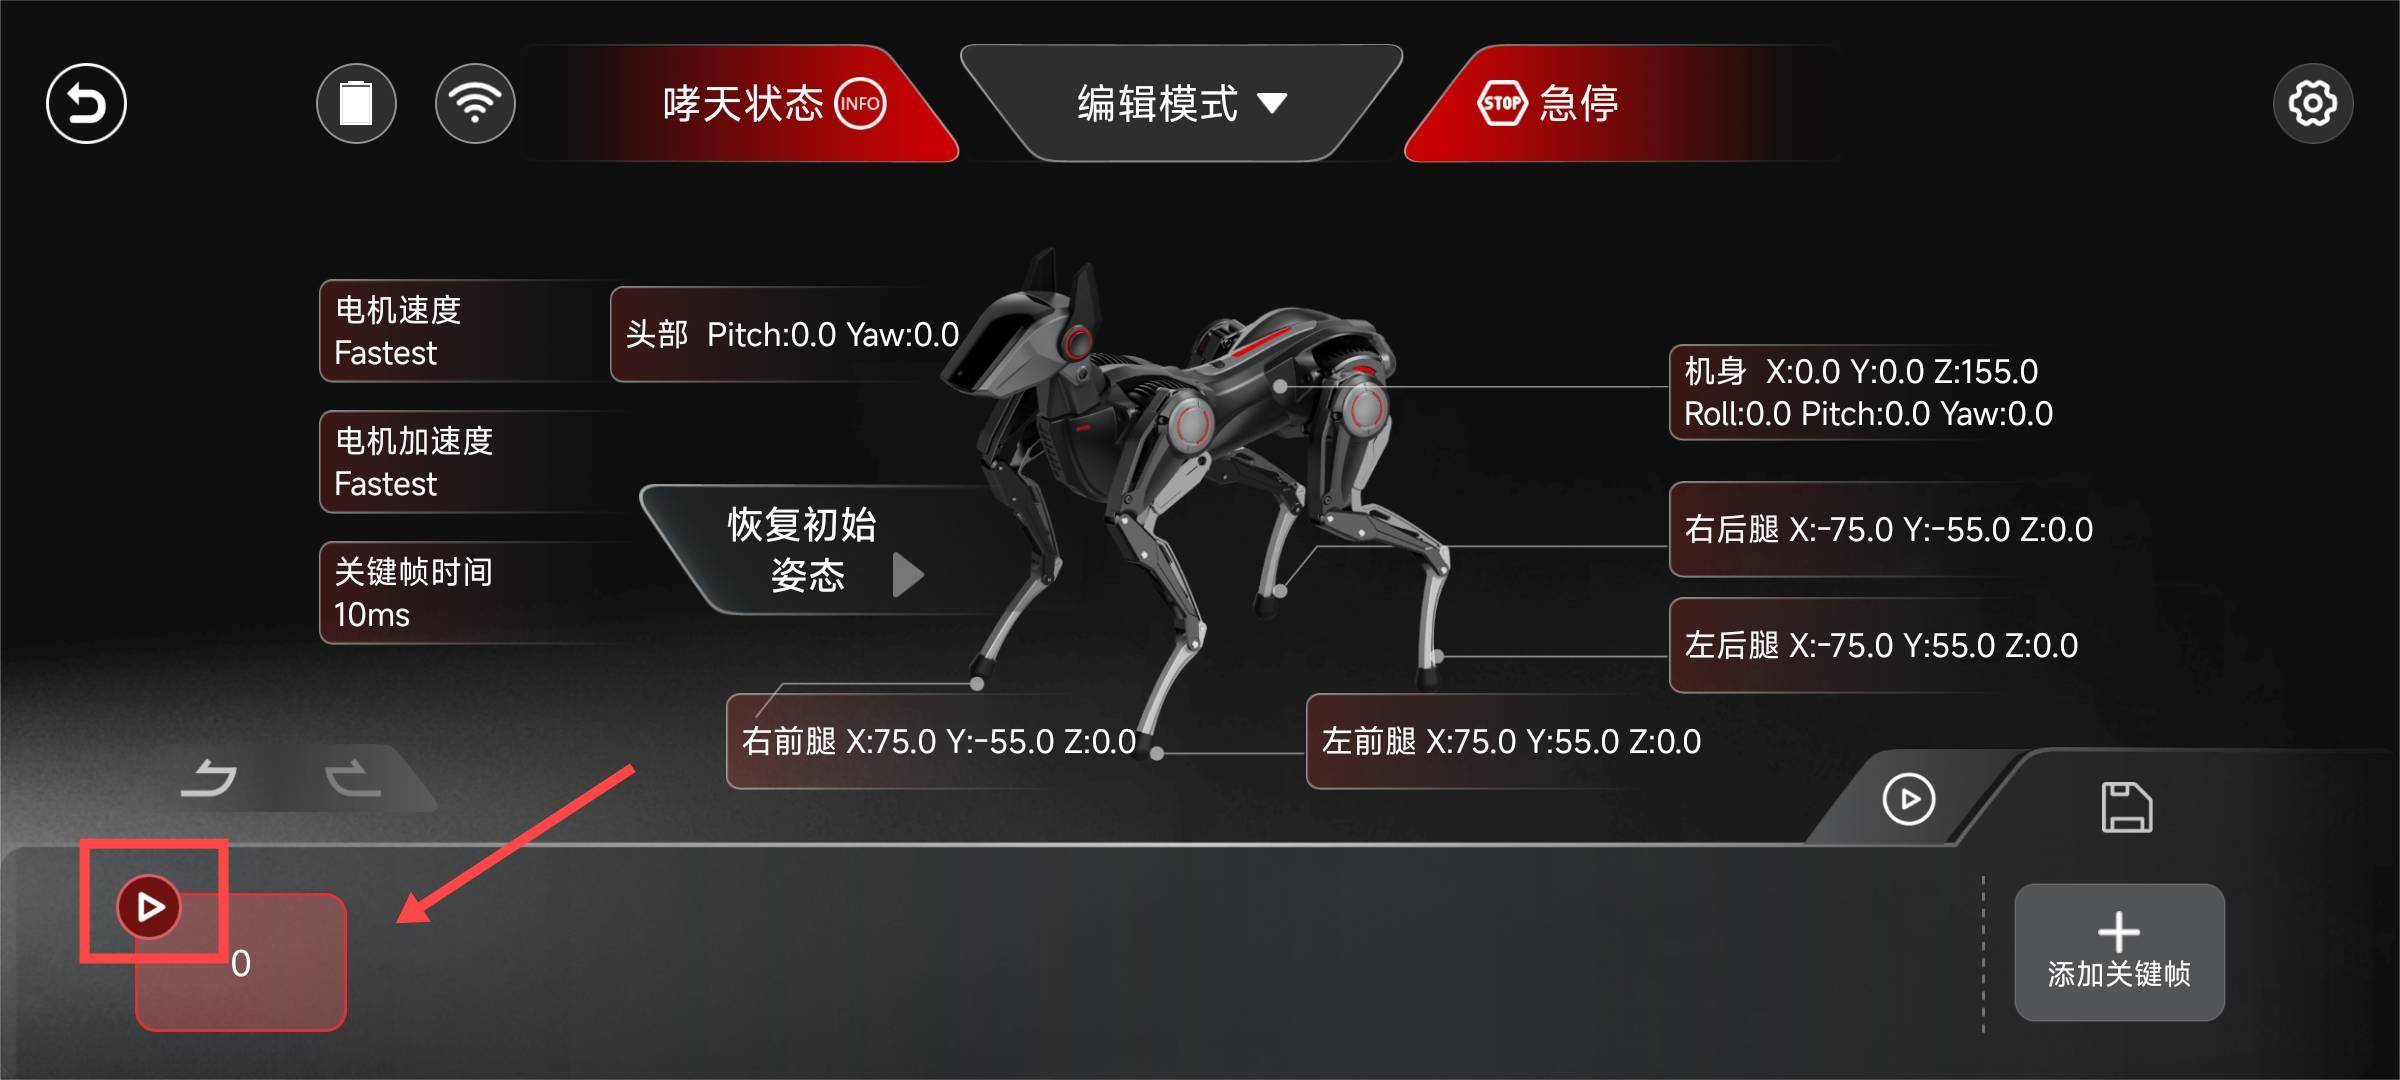 |
3.4 Adjust Parameter Items
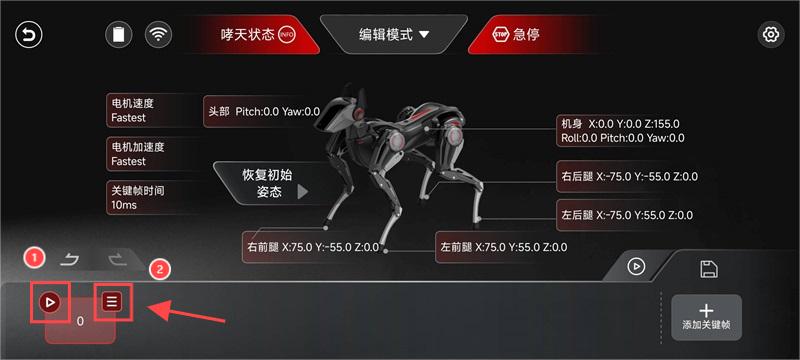
- Label 1: After clicking the play button, the edit button will pop up.
- Label 2: Click to enter the parameter editing page.
- Adjust motor parameters
| Parameter items | Related meanings and operations | Remarks |
|---|---|---|
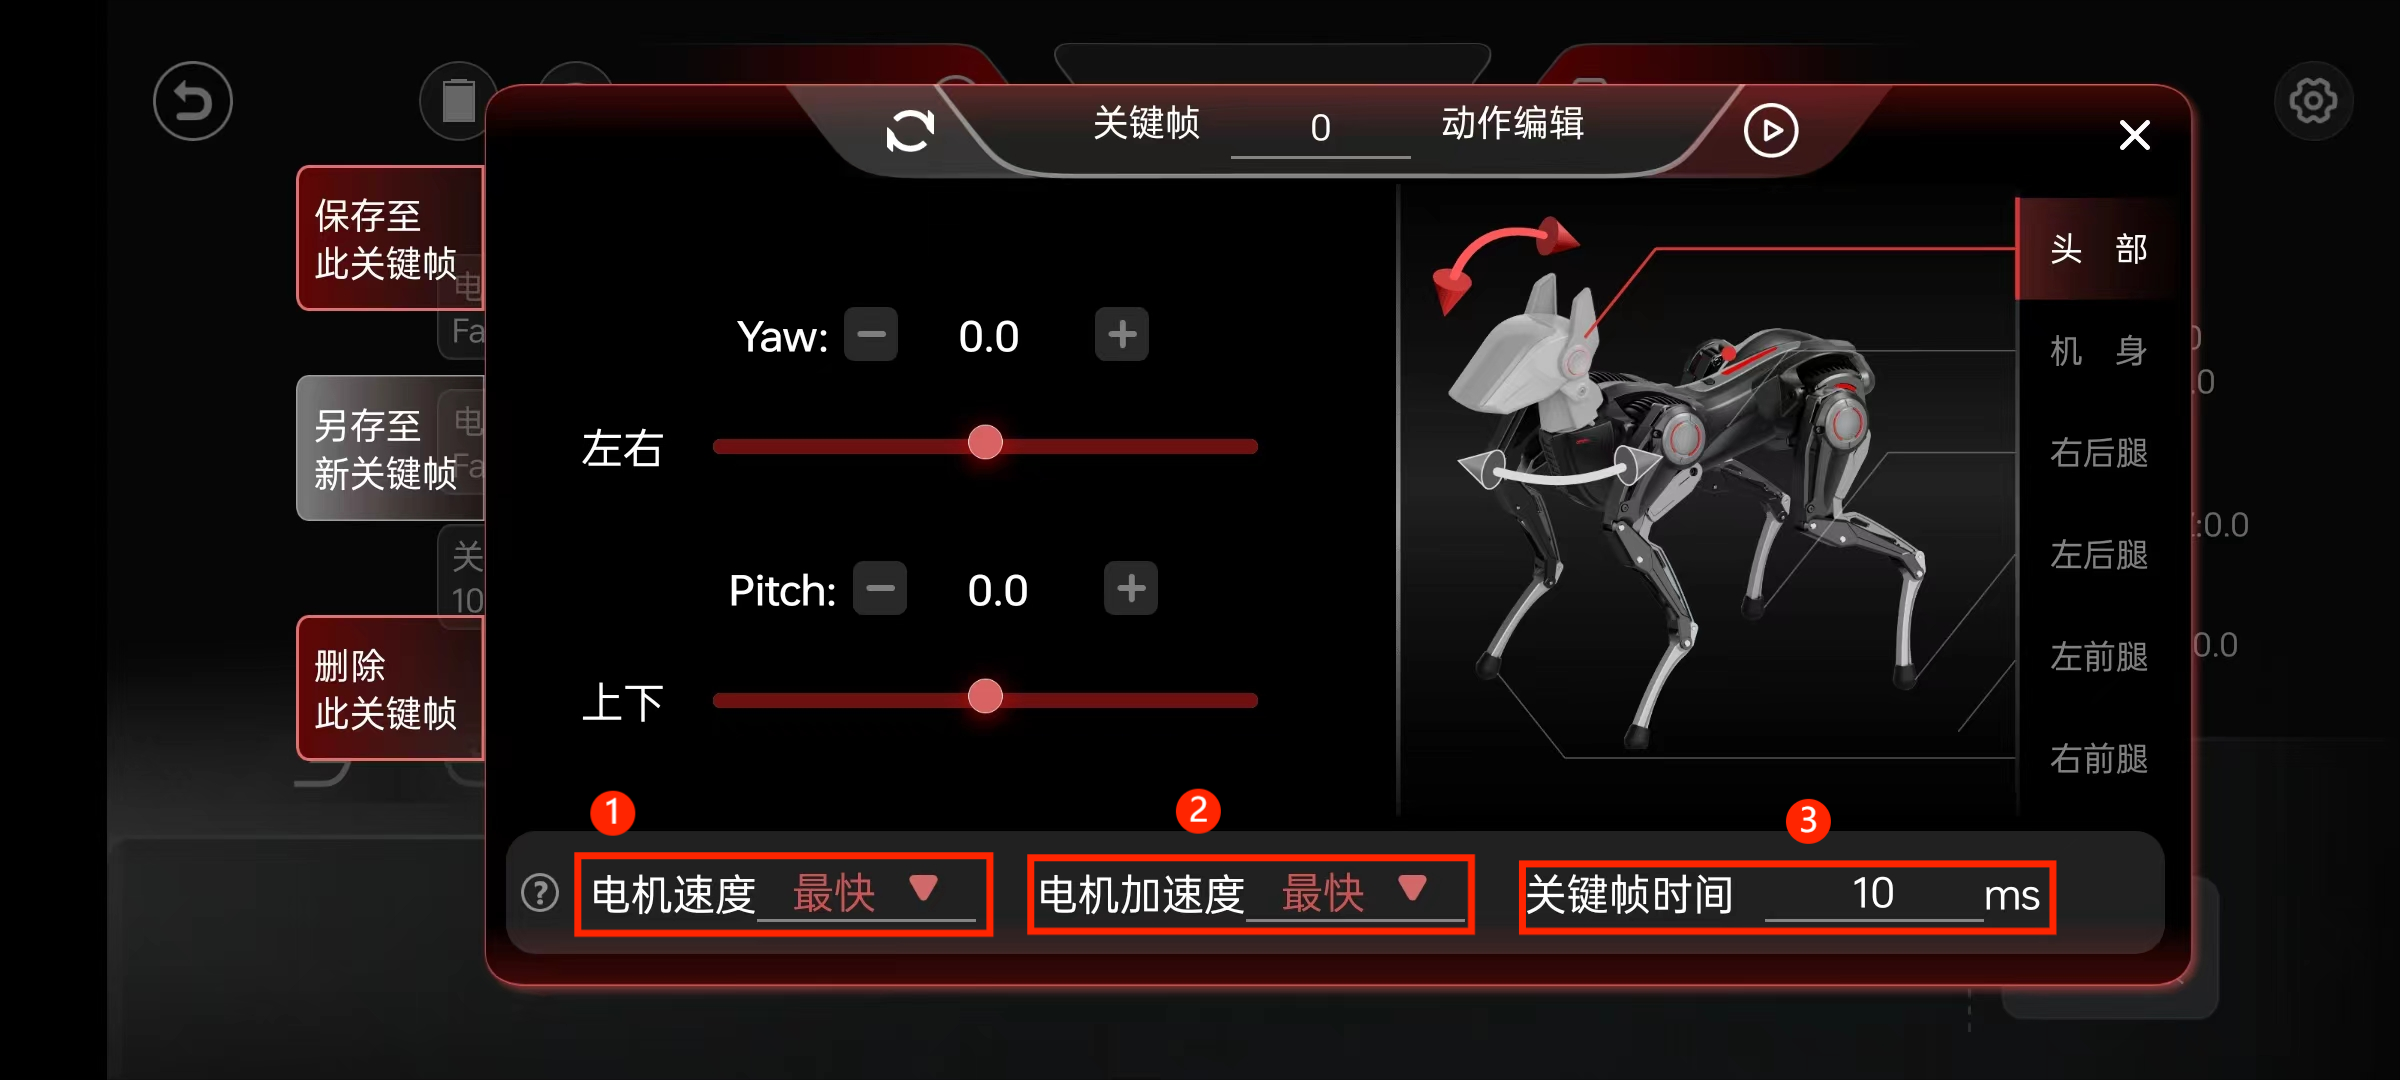 | ||
| Adjust the motor speed (label 1) | There are four options for motor speed adjustment: fastest, fast, slow, and slowest. | If the motor speed is adjusted to the fastest, the motor's response speed will be the fastest, which means it will quickly complete the actions of the action sets. Similarly, if the motor speed is adjusted to the slowest, the actions of the action sets will be completed in a slow and smooth state. |
| Adjust motor acceleration (label 2) | There are four options for adjusting motor acceleration: fastest, fast, slow, and slowest. | |
| Adjust keyframe time (label 3) | You can adjust the time of keyframes here, and it is recommended to set a frame time of 200ms. |
- Save, Save As, Delete Keyframes
| Parameter items | Related meanings and operations |
|---|---|
| |
| Label 1: Save to this keyframe | Click this option to save the currently edited keyframe to the current action sequence. |
| Label 2: Save as new Keyframe | Select this option to save the currently edited keyframe as a new independent keyframe. |
| Label 3: Delete this keyframe | Click this option to remove the currently selected keyframe from the action sequence. |
IV.Conclusion
The above content is a user guide for advanced remote control gameplay. For users with much curiosity, understanding the principles behind these remote control operations is very important. Therefore, we will now explore the core of remote control operations - the remote control API interface. Let's explore together.