Mid-level (III): WebSocket API
I.Preface
Before reading this document, please familiarize yourself with the relevant documentation of Sirius to learn its basic usage. HENGBOT assumes that you have a certain foundation in programming and development, and are familiar with the Python language and interface calling. Please note that this document does not provide detailed explanations or popularization of professional terminology. Let's follow the guidance in the document together and learn how to debug and develop Sirius's API interface to achieve more innovative and interesting features.
II.Preparation Work
We need to do some preparation work before use to make the follow-up use easier.
2.1 Hardware
- A Sirius updated to the latest mirror system (Version: hzwl831-m2dock-20240621)
2.2 Software
- Debugging tools
- Webscoket debugging website:http://wstool.js.org/
- Json format online conversion tool:https://www.sojson.com/
- Operating environment
- Sirius: By default, the network is connected and has obtained an IP address on the screen(例如“IP:192.168.8.232” )
- API test: By default, API test can only be carried out when the body is in remote control mode.
- PC: Python environment installed
The above environment construction will not be explained in detail in this document. If necessary, please refer to the following documents.
Meet Sirius: User Guide:Unboxing: Entry-level Configuration and Usage
III.Notes
In order to better use the API, you need to understand some physical definitions on Sirius's body.
| Reference pictures | |
|---|---|
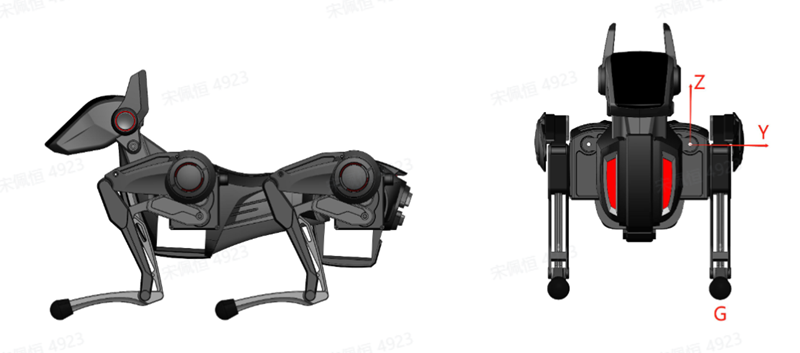 |  |
| Physical definitions on body | ||
|---|---|---|
| Remote control | move_x | When ove-x=1/-1, the maximum forward and backward speed is 0.28m/s |
| move_y | When move_y=1/-1, the maximum forward and backward speed is 0.3m/s | |
| move_w | When move_w=1, the maximum z-axis rotation speed is 2rad/s | |
| head_pitch | The range of motion is -1 ~ 1 rad. | |
| head_yaw | The range of motion is -1 ~ 1 rad. | |
| tranx | When tranx is in -1~1, the range of motion is 20mm forward and backward | |
| trany | When trany is in -1~1, the range of motion is 20mm left and right | |
| tranz | When tranz is in -1~1, the range of motion is 30mm up and down | |
| Keyframe | roll、pitch、yaw | Use the radian system, ranging from -1 to 1. |
| body | Tran-z in "body" is the unit of standing height of the body in millimeters | |
| Foot position | All units are in millimeters and the coordinate is in Cartesian coordinate system. |
IV.API Usage Process
Before enabling API usage, we need to learn how to implement API function through two main methods; They are respectively browser debugging and Python development. The following is the detailed usage process, which will guide you to start the journey of API experience!
4.1 Browser debugging of API
- Preparation stage: Prepare the software and hardware before use according to the preparation work.
- Verify connection: First, confirm whether Sirius can be connected normally.
- Test remote control gait: Test whether Sirius can give instructions and execute them.
- Record and playback: Experience the recording function in teaching demonstration mode, whether the preset recording script can be played.
- Play keyframes: Experience the keyframe function in Edit Mode, whether the preset keyframes can be played.
- Abnormal State Q&A: Learn how to restore normal use of Sirius when an abnormal state occurs.
4.2 More API Development Materials
- Detailed interpretation of API development materials: including mode switching and body posture reset, remote control mode, teaching demonstration mode, and edit mode.
- Python API tutorial
- Image transmission in MJPEG
V.Browser Debugging of API
Most API functions are related to the mode of the Sirius and need to be used in a specific mode. So when we establish a connection with Sirius, we need to switch modes first before using specific functions.
5.1 Connect to Sirius
We have already connected Sirius to the network and obtained an IP address in the preparation work, Here, take IP: 192.168.8.74 as an example.
Note: In case some users open it as https://wstool.js.org/ Please change "https" to "http". The browser security specification can only establish wws links, and ws links will lead to errors.
| Steps | Reference pictures |
|---|---|
Step 1: Click to enter the Webscoket debugging webpage and input the service address with the IP information as ws://<Sirius's IP>: 10710/getjson. Example: ws://192.168.8.74:10710/getjson | |
| Step 2: Click "Open Connection", and the debugging information will be returned after the Sirius connection is successful. Next, check the box 'Receive JSON Decoding'. Now, you can enable the debugging API function on the browser! | |
| Step 3: Try to send the first instruction to Sirius to get the basic state of Sirius's body! | {"cmd":"Get_Status"} |
| Step 4: Copy and paste the above instructions in the Send box and click Send. The message box on the right will return the status information of Sirius. |
We can try to interpret the meaning of the returned data. The data contains four main parts: battery information, hardware error status, network information, and status information. At present, only the following three parts of valid information are available, and the hardware status has not yet been standardized.
- Battery information:
- Battery capacity: 2340mAh
- Quantity of electricity: 87%
- Battery percentage: 93.6%
- Battery status indicator: discharging
- Charging time: 65535
- Present current: -1.62A (indicating that the battery is discharging)
- Instantaneous power: -11.664W (indicating that the battery is discharging)
- Temperature: 36°C
- Voltage: 7.2V
- Network information:
- Client IP address: 192.168.8.155
- Device IP address: 192.168.8.232
- SSID: test
- Feedback information: Get status (feedback: "Get_Status" may indicate that this is a status update feedback)
5.2 Test remote control gait
Notes:
- Brake mode and gait movement cause Sirius to enter the unloading force state. At this point, rapidly hold Sirius's waist to avoid damage caused by bumping or falling.
- Each time after mode switch, you need to send a command to reset the posture of Sirius before using it.
- The user can use the function of restoring the posture of Sirius's body according to the requirements, so as to adjust Sirius to a stable standing state.
After confirming that the robot can connect normally, refer to the following text to enable instruction testing to test whether Sirius can receive and execute instructions.
Test 1: Switch modes and restore normal posture
Send the code instructions to separately enter Remote Control Mode ->Brake Mode ->Restore Initial Posture. The effect video is as follows.
{"cmd":"Mode_Switch","target":"Remote_Control_Mode"}
{"cmd":"Mode_Switch","target":"Emergency_Stop"}
{"cmd":"Reset_Robot_Position"}
// Switch to Remote Control Mode
{"cmd":"Mode_Switch","target":"Remote_Control_Mode"}
// Enter Brake Mode, please hold Sirius's body before entering to prevent collision damage due to motor unloading force!!! Experimental function
{"cmd":"Mode_Switch","target":"Emergency_Stop"}
/* Restore Initial Posture */
{"cmd":"Reset_Robot_Position"}
Test 2: Test gait movement
Before starting the gait test, we first send instructions to ensure that Sirius has entered the Remote Control Mode. Next, please put Sirius on a flat and open ground or table, and we will do the gait test according to the following steps.
- Send the full-speed-ahead instruction and observe Sirius's full-speed-ahead posture. At this time, the record page will pop up with relevant parameter information.
- Send a stop command to end gait movement.
- After the test is completed, send an instruction to restore the body posture, so as to ensure that Sirius can safely return to its original posture.。
{"cmd":"Mode_Switch","target":"Remote_Control_Mode"}
{"cmd":"Control_Move","movex":1.0,"movey":0,"movew":0,"moveh":0,"tranx":0,"trany":0,"tranz":0,"roll":0,"pitch":0,"yaw":0,"headpitch":0,"headyaw":0,"speed":"normal"}
{"cmd":"Control_Move","movex":0,"movey":0,"movew":0,"moveh":0,"tranx":0,"trany":0,"tranz":0,"roll":0,"pitch":0,"yaw":0,"headpitch":0,"headyaw":0,"speed":"normal"}
{"cmd":"Reset_Robot_Position"}
// Switch to Remote Control Mode
{"cmd":"Mode_Switch","target":"Remote_Control_Mode"}
// Full speed ahead, put Sirius on a flat and open ground or table before starting!!!
{"cmd":"Control_Move","movex":1.0,"movey":0,"movew":0,"moveh":0,"tranx":0,"trany":0,"tranz":0,"roll":0,"pitch":0,"yaw":0,"headpitch":0,"headyaw":0,"speed":"normal"}
// Stop
{"cmd":"Control_Move","movex":0,"movey":0,"movew":0,"moveh":0,"tranx":0,"trany":0,"tranz":0,"roll":0,"pitch":0,"yaw":0,"headpitch":0,"headyaw":0,"speed":"normal"}
/* Restore Initial Posture */
{"cmd":"Reset_Robot_Position"}
5.3 Record and Playback
Record and Playback is a highlight feature in teaching demonstration mode. Before entering API development, let's first experience how to play recorded action frames.
Mode switching and body posture reset are the prerequisite steps for all mode functions. Please make sure to switch to teaching demonstration mode before starting to use.
{"cmd":"Mode_Switch","target":"Teach_Mode"}

{"cmd":"Start_Play"}

{"AIA":{"BackLeftLeg":{"x":-58.03042221069336,"y":19.174842834472656,"z":-166.43234252929688},"BackRightLeg":{"x":-64.67723846435547,"y":0.9458351135253906,"z":-164.07229614257813},"FrontLeftLeg":{"x":38.319374084472656,"y":-8.239791870117188,"z":-168.74769592285156},"FrontRightLeg":{"x":54.310855865478516,"y":21.319934844970703,"z":-165.0332794189453},"Head":{"pitch":0.3413107395172119,"yaw":0.0007669925689697266}},"cmd":"Playing","time":3000}

{"cmd":"Stop_Play"}

{"cmd":"Reset_Robot_Position"}
// Switch to Teaching Demonstration Mode
{"cmd":"Mode_Switch","target":"Teach_Mode"}
/* Action playback */
// 1、Send action playback command
{"cmd":"Start_Play"}
// 2、end all action frames that need to be played. Before starting, please hold Sirius's body to prevent collision damage caused by motor unloading force!!!
// The format difference from recording frames is "feedback": "Recording" replaced with "cmd": "Playing"
{"AIA":{"BackLeftLeg":{"x":-58.03042221069336,"y":19.174842834472656,"z":-166.43234252929688},"BackRightLeg":{"x":-64.67723846435547,"y":0.9458351135253906,"z":-164.07229614257813},"FrontLeftLeg":{"x":38.319374084472656,"y":-8.239791870117188,"z":-168.74769592285156},"FrontRightLeg":{"x":54.310855865478516,"y":21.319934844970703,"z":-165.0332794189453},"Head":{"pitch":0.3413107395172119,"yaw":0.0007669925689697266}},"cmd":"Playing","time":3000}

// Feedback information will be sent during the playback process, representing the time that has already been played
// {"feedback":"Recording""time":3000}

// 3. End playback
// Send this command to stop the timer for action playback
{"cmd":"Stop_Play"}

// 4、Restore to standing posture
{"cmd":"Reset_Robot_Position"}
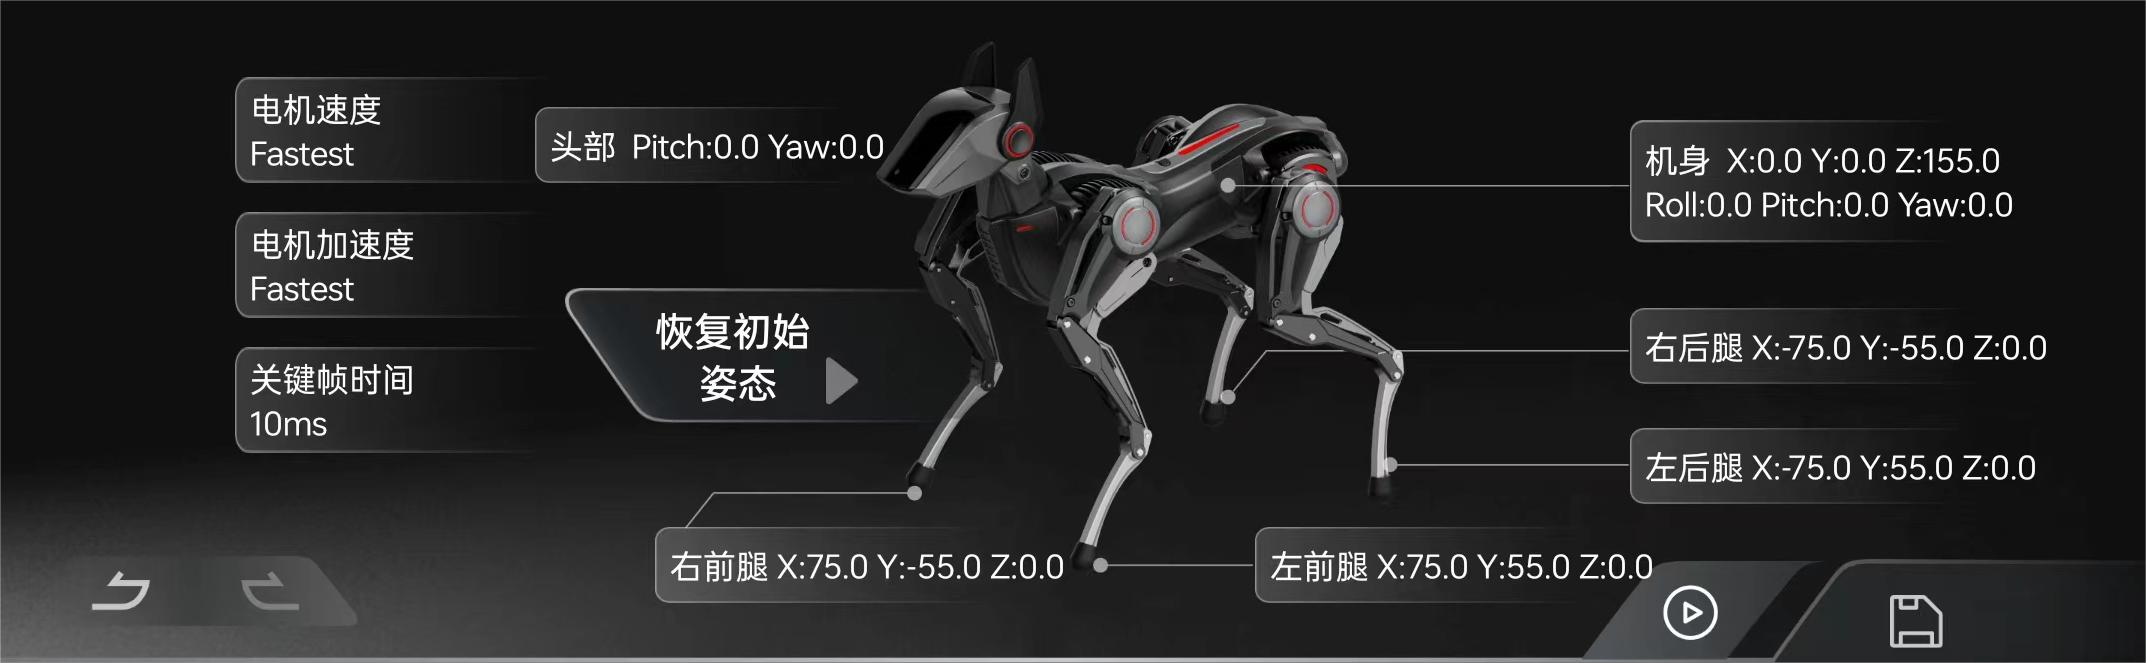
5.4 Play Keyframes
In Edit Mode, you can finely control the playback of actions. This mode uses the body coordinate system, which includes not only limb coordinates but also posture information of the body.
Play a compressed action keyframe together with HENGBOT!
Notes:
- Mode switch and body posture reset are the prerequisite steps for all mode functions, and it is necessary to confirm that the mode has been switched to edit mode before starting to use.
- Any key frames sent in edit mode will be executed immediately.
{"cmd":"Mode_Switch","target":"Edit_Mode"}

{"cmd":"Play_Keyframe","speed":"Fastest","acc":"Fastest","time":10,"Body":{"pitch":0.0,"roll":0.0,"tran_x":0.0,"tran_y":0.0,"tran_z":145.0,"yaw":0.0},"FootPoint":{"FrontLeftLeg":{"x":75.0,"y":48.0,"z":0.0},"FrontRightLeg":{"x":75.0,"y":-48.0,"z":0.0},"BackLeftLeg":{"x":-55.0,"y":48.0,"z":0.0},"BackRightLeg":{"x":-55.0,"y":-48.0,"z":0.0}},"Head":{"pitch":0.0,"yaw":0.0}}

{"cmd":"Reset_Robot_Position"}
// Switch to edit mode
{"cmd":"Mode_Switch","target":"Edit_Mode"}
/* Keyframe playback */
// Send compressed keyframes
{"cmd":"Play_Keyframe","speed":"Fastest","acc":"Fastest","time":10,"Body":{"pitch":0.0,"roll":0.0,"tran_x":0.0,"tran_y":0.0,"tran_z":145.0,"yaw":0.0},"FootPoint":{"FrontLeftLeg":{"x":75.0,"y":48.0,"z":0.0},"FrontRightLeg":{"x":75.0,"y":-48.0,"z":0.0},"BackLeftLeg":{"x":-55.0,"y":48.0,"z":0.0},"BackRightLeg":{"x":-55.0,"y":-48.0,"z":0.0}},"Head":{"pitch":0.0,"yaw":0.0}}
// Restore to the standing posture
{"cmd":"Reset_Robot_Position"}
5.5 Handling method of abnormal situation
Q: The command has been sent, but Sirius's body doesn't respond.
A: Need to send instructions in one of Remote Control Mode, Edit Mode, Teaching Demonstration Mode, please check it before sending instructions.
Q: Python has finished the process, but the process in Sirius continues.
A: After Python stops, you need to switch to any mode in the browser to stop this process.
Q: After the browser message page finishes the process, a large amount of data appears, which causes Sirius to run slowly.
A: The data volume is too large, which leads to a slow situation. Refresh the web page on the browser side.
VI.More API development materials
"Here is the detailed information about API for developers who need it. We don't go into the details of technical terms and their usage. For users without programming background, we recommend using the browser debugging method mentioned above to get a better experience."
6.1 Mode switching and body posture reset
There are five related modes for Sirius: Remote Control Mode, Teaching Demonstration Mode, Edit Mode, Brake Mode, and Freedom Mode. Among them, Remote Control Mode, Teaching Demonstration Mode, Edit Mode, and Brake Mode have already been available in the APP, while the Freedom Mode has not been available yet because its behavior process has not been determined.
Notes:
- Brake mode and gait movement cause Sirius to enter the unloading force state. At this point, rapidly hold Sirius's waist to avoid damage caused by bumping or falling.
- Each time after mode switch, you need to send a command to reset the posture of Sirius before using it.
- The user can use the function of restoring the posture of Sirius's body according to the requirements, so as to adjust Sirius to a stable standing state.
6.1.1 模式切换指令表
可根据下文指令来自由切换当下机器狗的模式及恢复机身姿态。
{"cmd":"Mode_Switch","target":"Remote_Control_Mode"}

{"cmd":"Mode_Switch","target":"Teach_Mode"}

{"cmd":"Mode_Switch","target":"Edit_Mode"}

{"cmd":"Mode_Switch","target":"Emergency_Stop"}

{"cmd":"Mode_Switch","target":"Free_Mode"}

{"cmd":"Reset_Robot_Position"}
/* Mode switching related commands */
// Switch to remote control mode
{"cmd":"Mode_Switch","target":"Remote_Control_Mode"}
// Switch to teaching demonstration mode
{"cmd":"Mode_Switch","target":"Teach_Mode"}
// Switch to edit mode
{"cmd":"Mode_Switch","target":"Edit_Mode"}
// Enter brake mode
{"cmd":"Mode_Switch","target":"Emergency_Stop"}
// Enter freedom mode (Functions not determined)
{"cmd":"Mode_Switch","target":"Free_Mode"}

/* Restore the body posture */
{"cmd":"Reset_Robot_Position"}
6.1.2 Usage description of mode order
The instruction interaction process for mode switching is all the same. Taking entering remote control mode as an example, the following are all the instructions required during the process.
{"cmd":"Mode_Switch","target":"Remote_Control_Mode"}

{"cmd":"Mode_Switch","target":"Emergency_Stop"}

{"cmd":"Reset_Robot_Position"}
// 1、Send the command to switch to remote control mode
{"cmd":"Mode_Switch","target":"Remote_Control_Mode"}
// * The robot side will reply to the received instructions (Hereinafter not repeated)
// < {"cmd":"Mode_Switch","target":"Remote_Control_Mode"}
// Before entering Brake Mode, please hold Sirius's body to prevent collision damage caused by motor unloading force!!!
{"cmd":"Mode_Switch","target":"Emergency_Stop"}
// 2�、Reset the body posture
{"cmd":"Reset_Robot_Position"}
6.2 Remote Control Mode
Prerequisite: Before executing this section, it is necessary to switch modes (Section 6.1) and confirm that it is in remote control mode.
The torque output of the motor in remote control mode is automatically controlled by the program, so functions such as walking remote control and fast action recording are relatively special in the current mode.
6.2.1 Walking remote control
Walking remote control is composed of a single multi-parameter instruction, and the meanings of different fields are roughly as follows:
| Name | Function |
|---|---|
| move | Used to control the position changes of the body |
| movex | Control forward and backward movement |
| movey | Control left and right movement |
| movew | Control in-situ rotation |
| tran | Used to control body displacement, the position of the four feet remains unchanged and only the center of gravity is changed. |
| roll、pitch、yaw | Used to control the posture of the body |
| headpitch、headyaw | Specially control the pitch and yaw of the head. |
| speed | Configure the step frequency. It does not affect the speed at present. |
{"cmd":"Control_Move","movex":1.0,"movey":0,"movew":0,"moveh":0,"tranx":0,"trany":0,"tranz":0,"roll":0,"pitch":0,"yaw":0,"headpitch":0,"headyaw":0,"speed":"normal"}

{"cmd":"Control_Move","movex":-1.0,"movey":0,"movew":0,"moveh":0,"tranx":0,"trany":0,"tranz":0,"roll":0,"pitch":0,"yaw":0,"headpitch":0,"headyaw":0,"speed":"normal"}

{"cmd":"Control_Move","movex":0,"movey":0,"movew":0,"moveh":0,"tranx":0,"trany":0,"tranz":0,"roll":0,"pitch":0,"yaw":0,"headpitch":0,"headyaw":0,"speed":"normal"}
The following instructions contain comments and some instructions that have not been compressed by json. Please read the comments before using them.
/* Uncompressed remote control instruction */
/* All the valid ranges of numerical values are -1 ~ 1 */
{
    "cmd": "Control_Move",
    "movex": 0.2, //
    "movey": 0,
    "movew": 0, // Angular velocity (rad/s) of counterclockwise motion around Z axis. In-situ rotation (currently not available)
    "moveh": 0, //The default value of reserved characters is 0 [February 26th]
    "tranx": 0, // The offset of the body on the X-axis,in the forward and backward directions.
    "trany": 0, //
    "tranz": 0, //Values between -1 and 1 represent the offset of body height (-35 ~ 35 mm)
    /* Body posture relative to the initial position */
    "roll": 0,
    "pitch": 0,
    "yaw": 0,
    /* Head posture relative to the initial position */
    "headpitch": 0,
    "headyaw": 0,
    /* Speed setting */
    "speed":"fast" //Speed configuration in walking state. The other value is “normal”

/* Compressed command */
// Full speed ahead
{"cmd":"Control_Move","movex":1.0,"movey":0,"movew":0,"moveh":0,"tranx":0,"trany":0,"tranz":0,"roll":0,"pitch":0,"yaw":0,"headpitch":0,"headyaw":0,"speed":"normal"}
// Full astern
{"cmd":"Control_Move","movex":-1.0,"movey":0,"movew":0,"moveh":0,"tranx":0,"trany":0,"tranz":0,"roll":0,"pitch":0,"yaw":0,"headpitch":0,"headyaw":0,"speed":"normal"}
// Stop
{"cmd":"Control_Move","movex":0,"movey":0,"movew":0,"moveh":0,"tranx":0,"trany":0,"tranz":0,"roll":0,"pitch":0,"yaw":0,"headpitch":0,"headyaw":0,"speed":"normal"}
6.2.2 Quick Action Recording
The torque of the motor in walking mode is automatically controlled by the program. Rapid recording may cause the robot to completely unload force. It is important to grab the robot before starting recording to avoid damage caused by bumping or falling.
Commands during rapid recording process:
{"cmd":"Start_Record"}

{"cmd":"Stop_Record"}

{"cmd":"Reset_Robot_Position"}
// 1、Start recording
{"cmd":"Start_Record"}

// *Note: the torsion output of the robot's limbs will be turned off, so be sure to hold the robot before starting rapid recording.
// *After receiving the data, the robot will send back the data of foot coordinates and head posture.
// See the table below for the returned data format.

// 2、End the recording
// *After the recording ends, the torque output will be turned on, and the robot will maintain its current posture
{"cmd":"Stop_Record"}

// 3、Restore to standing posture
{"cmd":"Reset_Robot_Position"}
Feedback data: The robot does not store recorded data and users need to store it themselves for playback purposes. The data is transmitted using the hip joint coordinate system, which is only related to the installation position of the legs and not to the position of the body. Time represents the time elapsed from the start of recording to the current frame, and is used for timing synchronization during playback.
/*  Compressed data */
{"AIA":{"BackLeftLeg":{"x":-58.03042221069336,"y":19.174842834472656,"z":-166.43234252929688},"BackRightLeg":{"x":-64.67723846435547,"y":0.9458351135253906,"z":-164.07229614257813},"FrontLeftLeg":{"x":38.319374084472656,"y":-8.239791870117188,"z":-168.74769592285156},"FrontRightLeg":{"x":54.310855865478516,"y":21.319934844970703,"z":-165.0332794189453},"Head":{"pitch":0.3413107395172119,"yaw":0.0007669925689697266}},"feedback":"Recording","time":2359}

/* Decompressed data */
{
  "AIA":{
    "BackLeftLeg":{
      "x":-58.03042221069336,
      "y":19.174842834472656,
      "z":-166.43234252929688
    },
    "BackRightLeg":{
      "x":-64.67723846435547,
      "y":0.9458351135253906,
      "z":-164.07229614257812
    },
    "FrontLeftLeg":{
      "x":38.319374084472656,
      "y":-8.239791870117188,
      "z":-168.74769592285156
    },
    "FrontRightLeg":{
      "x":54.310855865478516,
      "y":21.319934844970703,
      "z":-165.0332794189453
    },
    "Head":{
      "pitch":0.3413107395172119,
      "yaw":0.0007669925689697266
    }
  },
  "feedback":"Recording",
  "time":2359
}
6.3 Teaching demonstration mode
Mode (section 6.1) switch and body posture reset are the prerequisite steps for all mode functions, and it is necessary to confirm that the mode has been switched to teaching demonstration mode before starting to use.
In teaching demonstration mode, users can interfere with the torque output of the motor, and recording in this mode allows for a small amount of torque output, which is used to finely control the posture.
6.3.1 Command list/motor torque configuration
{"cmd":"Get_Parameter","parameter":"Output_Torque","type":"AIA_ALL"}

{"cmd":"Set_Parameter","type":"AIA_Head","parameter":"Output_Torque","value":"Enable"}
{"cmd":"Set_Parameter","type":"AIA_Head","parameter":"Output_Torque","value":"Disable"}

{"cmd":"Set_Parameter","type":"AIA_Head","parameter":"Output_Torque","value":"Limit"}

{"cmd":"Set_Parameter","type":"AIA_Head","parameter":"Output_Torque","value":"UnLimit"}

{"cmd":"Set_Parameter","type":"AIA_Head","parameter":"Output_Torque","value":"Limit"}
{"cmd":"Set_Parameter","type":"AIA_FrontLeft","parameter":"Output_Torque","value":"Limit"}
{"cmd":"Set_Parameter","type":"AIA_FrontRight","parameter":"Output_Torque","value":"Limit"}
{"cmd":"Set_Parameter","type":"AIA_BackLeft","parameter":"Output_Torque","value":"Limit"}
{"cmd":"Set_Parameter","type":"AIA_BackRight","parameter":"Output_Torque","value":"Limit"}

{"cmd":"Set_Parameter","type":"AIA_ALL","parameter":"Output_Torque","value":"Limit"}

{"cmd":"Start_Record"}

{"cmd":"Stop_Record"}

{"cmd":"Reset_Robot_Position"}
/* Obtain the torque output configuration of the motor */
{"cmd":"Get_Parameter","parameter":"Output_Torque","type":"AIA_ALL"}

/* Set motor torque output */
// Attention: Before performing fine control of motor torque, it is necessary to confirm that the mode is not in remote control mode, otherwise the torque output will not take effect
// Five configurable actuators (limbs and head) AIA_Head, AIA_FrontLeft, AIA_FrontRight, AIA_BackLeft and AIA_BackRight.
// Configurable parameters Enable/Disable Limit/UnLimit.
// * Enable and Disable can switch each other. Limit and UnLimit only takes effect under Enable.
{"cmd":"Set_Parameter","type":"AIA_Head","parameter":"Output_Torque","value":"Enable"}
{"cmd":"Set_Parameter","type":"AIA_Head","parameter":"Output_Torque","value":"Disable"} // Remote control mode: the default strategy of rapid recording mode (completely disabled)
{"cmd":"Set_Parameter","type":"AIA_Head","parameter":"Output_Torque","value":"Limit"}   // The strategy of recording in teaching demonstration mode
{"cmd":"Set_Parameter","type":"AIA_Head","parameter":"Output_Torque","value":"UnLimit"} // The strategy of recording in teaching demonstration mode

/* Action recording */
// (Optional) 1. Configure the motor torque strategy [two ways]
// 1.a It is recommended to use the Limit mode to experience the recording in the teaching demonstration mode [configure each limb independently].
{"cmd":"Set_Parameter","type":"AIA_Head","parameter":"Output_Torque","value":"Limit"}
{"cmd":"Set_Parameter","type":"AIA_FrontLeft","parameter":"Output_Torque","value":"Limit"}
{"cmd":"Set_Parameter","type":"AIA_FrontRight","parameter":"Output_Torque","value":"Limit"}
{"cmd":"Set_Parameter","type":"AIA_BackLeft","parameter":"Output_Torque","value":"Limit"}
{"cmd":"Set_Parameter","type":"AIA_BackRight","parameter":"Output_Torque","value":"Limit"}
// 1.B 同时配置所有电机[所有配置]
{"cmd":"Set_Parameter","type":"AIA_ALL","parameter":"Output_Torque","value":"Limit"}

// 2.Start recording
// *Note: After recording in teaching demonstration mode, the motor will output a small amount of torque, which is used to adjust the posture.
// *After receiving the data, the robot will send back the data of foot coordinates and head posture.
// The returned data format is consistent with the fast action recording.
{"cmd":"Start_Record"}

// 3.End the recording
// *Torsion output will increase after recording
{"cmd":"Stop_Record"}

// 4. Return to the standing posture
{"cmd":"Reset_Robot_Position"}
6.3.2 Action playback
Action playback involves the serialization and deserialization of data, so it is not recommended for users to use API directly.
Playback process
{"cmd":"Start_Play"}

{"AIA":{"BackLeftLeg":{"x":-58.03042221069336,"y":19.174842834472656,"z":-166.43234252929688},"BackRightLeg":{"x":-64.67723846435547,"y":0.9458351135253906,"z":-164.07229614257813},"FrontLeftLeg":{"x":38.319374084472656,"y":-8.239791870117188,"z":-168.74769592285156},"FrontRightLeg":{"x":54.310855865478516,"y":21.319934844970703,"z":-165.0332794189453},"Head":{"pitch":0.3413107395172119,"yaw":0.0007669925689697266}},"cmd":"Playing","time":3000}

{"cmd":"Stop_Play"}

{"cmd":"Reset_Robot_Position"}
/* Action playback */
// 1. Send an action play command.
{"cmd":"Start_Play"}
// 2. Send all action frames that need to be played.
// The format difference with the recorded frame is that "feedback": "Recording" is replaced by "cmd": "Playing".
{"AIA":{"BackLeftLeg":{"x":-58.03042221069336,"y":19.174842834472656,"z":-166.43234252929688},"BackRightLeg":{"x":-64.67723846435547,"y":0.9458351135253906,"z":-164.07229614257813},"FrontLeftLeg":{"x":38.319374084472656,"y":-8.239791870117188,"z":-168.74769592285156},"FrontRightLeg":{"x":54.310855865478516,"y":21.319934844970703,"z":-165.0332794189453},"Head":{"pitch":0.3413107395172119,"yaw":0.0007669925689697266}},"cmd":"Playing","time":3000}

// Feedback information will be sent during the playback process, representing the time that has already been played.
// {"feedback":"Recording""time":3000}

// 3. End playback
// Send this command to stop the timer for action playback
{"cmd":"Stop_Play"}

// 4. Restore to standing posture
{"cmd":"Reset_Robot_Position"}
6.4 Edit mode
Notes:
- Mode switch and body posture reset are the prerequisite steps for all mode functions, and it is necessary to confirm that the mode has been switched to edit mode before starting to use.
- Any key frames sent in edit mode will be executed immediately.
6.4.1 Keyframe Example
The "time" attribute in keyframes represents the duration of the frame, which is different from the meaning of action sets.
/* Keyframe content*/
    {
        "cmd": "Play_Keyframe",
        "speed": "Fastest",
        "acc": "Fastest", // Fastest, Fast, Slow, Slowest corresponding to four speed and acceleration configuration options.
        "time": 10,//The duration of the current frame (ms)
        "Body": {
            "pitch": 0.0,//Using the radian system, ranging from -1 to 1
            "roll": 0.0,//Using the radian system, ranging from -1 to 1
            "tran_x": 0.0,
            "tran_y": 0.0,
            "tran_z": 141.0, //It is recommended to use 145mm as the standing height for the new body
            "yaw": 0.0
        },
        "FootPoint": { //he world coordinates of the foot endpoints in the initial state can be considered that all four foot endpoints are located on the ground at this time.
            "FrontLeftLeg": {
                "x": 75.0,
                "y": 48.0,
                "z": 0.0
            },
            "FrontRightLeg": {
                "x": 75.0,
                "y": -48.0,
                "z": 0.0
            },
            "BackLeftLeg": {
                "x": -55.0,
                "y": 48.0,
                "z": 0.0
            },
            "BackRightLeg": {
                "x": -55.0,
                "y": -48.0,
                "z": 0.0
            }

        },
        "Head": {
                "pitch": 0.0,//Using the radian system, ranging from -1 to 1
                "yaw": 0.0//Using the radian system, ranging from -1 to 1
        }
    }
6.4.2 Play keyframes
{"cmd":"Play_Keyframe","speed":"Fastest","acc":"Fastest","time":10,"Body":{"pitch":0.0,"roll":0.0,"tran_x":0.0,"tran_y":0.0,"tran_z":145.0,"yaw":0.0},"FootPoint":{"FrontLeftLeg":{"x":75.0,"y":48.0,"z":0.0},"FrontRightLeg":{"x":75.0,"y":-48.0,"z":0.0},"BackLeftLeg":{"x":-55.0,"y":48.0,"z":0.0},"BackRightLeg":{"x":-55.0,"y":-48.0,"z":0.0}},"Head":{"pitch":0.0,"yaw":0.0}}

{"cmd":"Reset_Robot_Position"}
/* Keyframe playback */
// Send compressed keyframes
{"cmd":"Play_Keyframe","speed":"Fastest","acc":"Fastest","time":10,"Body":{"pitch":0.0,"roll":0.0,"tran_x":0.0,"tran_y":0.0,"tran_z":145.0,"yaw":0.0},"FootPoint":{"FrontLeftLeg":{"x":75.0,"y":48.0,"z":0.0},"FrontRightLeg":{"x":75.0,"y":-48.0,"z":0.0},"BackLeftLeg":{"x":-55.0,"y":48.0,"z":0.0},"BackRightLeg":{"x":-55.0,"y":-48.0,"z":0.0}},"Head":{"pitch":0.0,"yaw":0.0}}
//Restore to standing posture
{"cmd":"Reset_Robot_Position"}
6.5 Using Python to Control Robot Motion
The following program needs to be adjusted according to the user's actual usage environment and robot IP, and this is not a public release version.
Note: The Python environment is already installed by default. Please refer to the following command to install the relevant dependency packages.
# Partial dependency package
pip install numpy websockets websocket-client opencv-python pillow matplotlib -i https://pypi.tuna.tsinghua.edu.cn/simple
Using Python to control robot motion, source code::controi_UI.py
Jupyter notebook test
We have tested that Jupyter Notebook can be used normally under Windows/linux. The following connection is the ipynb package for remote control function test.
6.6 Graphical GUI controls the motion of Sirius in various dimensions.
Source code:keyDrame_UI.py
6.7 Graphic GUI recording and playing actions
Source code:record_UI.py
6.8 Visualize and generate waveform curves to control the rhythmic movement of Sirius in all degrees of freedom.
Source code:wave_control_GUI.py
Websocket can run on both remote and local sides
When Sirius runs websocket locally (such as 831/X3), the IP address needs to be changed to 127.0.0.1.
6.6 MJPEG Video Transmission
Users can run it directly in the browser and experience the scenery from the perspective of Sirius together.
Example: http://<Sirius IP>:8080http://192.168.8.232:8080